Author: SEO

Plenum Cabling Requirements for NYC Commercial Ceilings

Most NYC office build-outs run network cable through the same overhead space the building uses to move air. That space is called a plenum, and any cable inside it has to meet plenum-rated fire safety standards. The short answer on plenum cabling requirements for NYC commercial ceilings is simple. If the cable shares space with return air, it must be CMP rated, low-smoke, and listed for air-handling environments. Generic PVC cable does not qualify, and an inspector who finds it will fail the install.

This guide covers what counts as a plenum space, how the NYC DOB fire code plenum cable rules apply, how the cable grades compare, and what a tenant carries as liability if the wiring is wrong.

What Plenum-Rated Cable Is and Why NYC Requires It?

Plenum cable uses a fire-resistant jacket that releases very little smoke and stops flame spread under burn testing. It is built for ceiling cavities, raised floors, and other spaces where air circulates freely. In a fire, ordinary PVC-jacketed cable melts, drips, and releases dense toxic smoke. That smoke moves through the same return-air pathway employees breathe from, which is what makes the jacket type a life-safety issue rather than a wiring preference.

The reason NYC commercial buildings lean so heavily on plenum cable comes down to design. Most Midtown and FiDi office floors use the area above the drop ceiling as a return-air pathway, with no separate ducts pulling exhaust back to the HVAC unit. The ceiling cavity does that job, and any cable installed up there is treated as part of the air system.

How NYC DOB Fire Codes Treat Air-Handling Spaces

The New York City Department of Buildings classifies any ceiling or floor cavity used for environmental air as a plenum, and the cable inside it must carry a CMP rating from a recognized testing lab. The rules pull from the NYC Electrical Code, which adapts the National Electrical Code with city-specific amendments, alongside FDNY enforcement on fire alarm and life safety circuits.

An inspector looking at a Manhattan office build-out checks three things. The cable jacket markings, the route the cable takes through the ceiling, and the documentation showing the listing. Cable without a clear CMP stamp gets flagged. Cable run inside metal conduit has more flexibility, but most low-voltage runs in commercial offices are open-air pulls, so the jacket rating is doing the work.

Where the Plenum Rule Most Often Applies

The NYC spaces that almost always trigger plenum requirements include the area above suspended acoustic tile ceilings, raised computer-room floors, vertical riser shafts shared with HVAC return, and any pathway feeding rooftop units. If a building uses ducted returns instead of an open plenum, the rule may relax, but few NYC commercial buildings are designed that way.

Comparing CMP, CMR, and CM Cable for Office Wiring

The CMP vs CMR cable office building debate comes up on almost every commercial buildout. Each grade has a defined use case, and the wrong rating in the wrong location is what fails an inspection.

Cable RatingCommon NameAllowed Location in NYC OfficesBurn Behavior
CMPPlenumDrop ceilings, return-air spaces, raised floorsLow smoke, low flame spread, fluorinated jacket
CMRRiserVertical floor-to-floor shafts not used for return airStops flame from climbing between floors
CM / CMGGeneral PurposeSingle-floor wall runs with no air handlingStandard PVC, fails plenum smoke test
CMXLimited UseResidential or short patch runsNot accepted in NYC commercial ceilings

A Frequent Substitution Mistake

A common shortcut on smaller jobs is using CMR riser cable in a drop ceiling because it runs cheaper per foot than CMP. Riser cable passes a vertical flame test but does not meet the smoke density limits required in a plenum, and that distinction is exactly what FDNY and DOB inspectors look for.

Cable Models You Will See on NYC Commercial Specs

Most reputable installers stick to a short list of cable models with documented CMP listings. Familiar Cat6 and Cat6a plenum options come from Belden, CommScope, Berk-Tek, Superior Essex, and Hitachi. Each one publishes UL listing data accepted by NYC inspectors. For fire alarm circuits, FPLP-rated lines such as Honeywell Genesis and Windy City Wire SmartWire FPLP appear on most submittal sheets.

The shorthand on a drawing usually reads CMP for copper, FPLP for fire alarm power-limited, and OFNP or OFCP for fiber. A contractor on a commercial structured cabling project should match the model number on the box to the line item on the spec, since substitutions are a frequent reason submittals get rejected by the building engineer.

The Tenant Liability of Non-Compliant Network Wiring

The tenant occupying the space at the time of inspection carries direct responsibility for non-compliant cable inside the leased premises, even if a previous tenant installed it. That is the part most business owners learn the hard way during a build-out or a lease renewal.

If a Midtown office is found with PVC cable above the drop ceiling during a routine FDNY inspection or a renovation permit review, the resulting violation lands on the current occupant. Costs include removal of the existing wiring, fines, re-inspection fees, and full reinstallation with code-compliant material. A floor of cabling that should have cost the original installer a few thousand dollars more can turn into a five-figure problem years later. This is also why integration with commercial fire alarm systems gets reviewed closely during any tenant improvement, since alarm circuits share the same ceiling cavity as data and voice runs.

How to Tell if Your Office Has a Plenum Ceiling

Look up. If you see acoustic ceiling tiles in a metal grid and there are no visible round or rectangular metal ducts running between the tiles and the structural slab above, the space is almost certainly being used as a return-air plenum. Buildings with fully ducted HVAC have insulated metal returns visible above the tile, but in NYC that setup is the exception rather than the rule.

A Fast On-Site Check

Two quick checks help confirm it. Pop a single ceiling tile and look for return-air grilles cut into the ceiling with no ductwork attached behind them. Then ask the building engineer for a copy of the floor mechanical drawings. If the drawings label the ceiling cavity as a return plenum, the cable rules follow automatically.

Does Fiber Optic Cable Need to Be Plenum Rated?

Yes. Fiber installed in a plenum space follows the same rule as copper and must be listed as OFNP or OFCP based on the cable construction. Optical fiber on its own does not produce smoke, but the outer jacket and strength members do. OFNP applies to non-conductive fiber, and OFCP applies to fiber that contains conductive components.

Many office network refreshes assume fiber gets a pass because it does not carry electrical current. The NYC code does not read that way. The plenum requirement targets the burn behavior of the entire cable assembly, not the signal it carries. Single-mode and multimode backbones running between MDF and IDF closets through ceiling space should always carry the plenum listing on the spec sheet, the box label, and the as-built drawings.

Plenum compliance is one area where the rule is well-defined but the financial fallout of getting it wrong lands entirely on the tenant. Knowing how to read a ceiling, how to read a cable jacket, and how to spot a substituted rating on a spec sheet protects the office, the lease, and the people working inside it.

The Hidden Costs of Retrofitting AV in Finished Conference Rooms

Most teams plan conference room technology after the space is already built. By then the walls are closed, the ceiling grid is set, and adding cameras, microphones, displays, and control panels means cutting into finished surfaces.

The hidden costs of retrofitting AV in a finished conference room come from extra labor, wall repair, change orders, and design trade-offs that early planning would have removed. A room wired before the drywall goes up often costs a fraction of the same room fitted out months later.

Here is a clear look at where that money goes, why New York offices feel it more than most, and what your options are if the room is already finished.

Why Retrofitting AV Costs More Than Pre-Wiring

Retrofitting is expensive because technicians have to work around finished surfaces instead of open framing. Running cable through an exposed wall cavity is fast. Running that same cable through a closed wall means fishing it behind drywall, drilling past fire-stops, opening access points, and patching every hole once the pull is done.

Timing piles on top of that. During a build-out, the AV crew shares the room with electricians and framers, so coordination is baked into the schedule. After move-in, the same crew has to work around occupied desks, weekend building access, and narrow freight elevator windows. Each of those limits turns into billable hours.

How Change Orders Inflate NYC Conference Room Budgets

A single change order on a finished space can add thousands before any equipment goes on the wall. Once a project is underway, anything outside the original scope gets priced as a change order, and finished-room AV work almost always falls into that bucket.

Union labor and building rules

In many Manhattan commercial buildings, low-voltage and electrical work falls under union jurisdiction, with set rates and crew minimums. Opening a wall, running new conduit, and patching it can pull in more than one trade, and after-hours rules common in NYC towers push some of that work into premium overtime windows. A retrofit that looks simple on paper can carry coordination fees a pre-construction plan would never trigger.

Pre-Wire vs Retrofit AV Cost, Side by Side

Pre-wiring removes most of the demolition, patching, and scheduling costs that make retrofits expensive. The table below compares the same mid-size conference room handled two ways, using typical New York ranges.

Cost factorPre-wire during build-outPost drywall AV installation cost
Cable pathwaysRun through open walls, low laborFished behind closed walls, high labor
Wall and ceiling repairNone neededCutting, patching, repaint
Change ordersFolded into base scopeAdded on top, often at premium rates
Trade coordinationShared with other crewsStandalone visits, building access fees
Cable concealmentHidden inside wallsSurface raceways, added materials
TimelineAligned with constructionStretched across occupied hours

The gap is rarely small. Materials are a minor line item, while labor, repair, and lost time carry the real weight once a room is closed up.

The Aesthetic Problem in Soho Pre-War and Brooklyn Brick Offices

Older NYC spaces make retrofits harder because there is nowhere clean to route cable. Pre-war Soho buildings often have solid plaster ceilings with no accessible cavity, so a technician cannot lift a tile and feed a line overhead.

Exposed-brick Brooklyn offices create the same headache from a design angle. The look that makes those rooms appealing also leaves wiring with no place to disappear. Surface raceways handle the function but break the aesthetic, and chasing channels into brick or plaster is slow, messy, and rarely reversible.

How to Hide Cables in a Finished Glass Conference Room

In a glass-walled room you route cable through the floor, the ceiling above the glass, or slim furniture-integrated channels rather than the partition itself. Glass gives you no cavity, so the wiring has to travel around the perimeter or up through the table.

Practical routing options

Floor boxes and poke-throughs bring power and data straight to the conference table, which keeps cable off the glass entirely. Where the ceiling is accessible, a tech can drop a clean feed at the display and run everything else above the grid. Table grommets and cable cubbies cover the last few feet to laptops and room controllers. None of these match the result of cable run before the glass went in, but they keep a finished room usable without tearing it apart.

Which Room Size and Equipment Models Shape the Final Cost

The amount of cabling, and therefore the retrofit cost, scales with room size and the gear you choose. A small huddle space built around an all-in-one video bar needs far fewer runs than a large boardroom with ceiling mics, dual cameras, and a control processor.

Common equipment tiers

A six-person room often runs on a single video bar such as a Poly Studio X30 or Logitech Rally Bar Mini, paired with one display and a wireless presentation unit like Barco ClickShare.

A mid-size room for eight to twelve people usually adds a PTZ camera, a beamforming ceiling microphone, a DSP, and a touch panel, with kits like the Crestron Flex or Poly G7500. Large boardrooms layer in dual cameras, more ceiling speakers, voice control, and a Poly Studio X70 class system. Every added microphone, speaker, and camera is one more cable, and in a finished room each of those runs carries the retrofit premium described above.

Bringing In an AV Integrator Before the Walls Close

Bringing In an AV Integrator Before the Walls Close

The cheapest moment to plan AV is during design, well before drywall. If you are building or renovating, looping in an integrator early lets the cable paths get drawn alongside the electrical plan, which is the entire value of pre-construction cabling for a new space.

If the room is already finished, the work still gets done. It simply costs more and asks for a few design compromises. A walkthrough with a team that handles conference room AV installation will tell you what can route cleanly, what needs a raceway, and where the budget will land. Either way, knowing the cost drivers ahead of time keeps the expensive surprises off your invoice.

Integrating Access Control with Elevator Destination Dispatch Systems

An employee taps a badge in the lobby, a screen sends them to elevator car C, they ride up, then reach for a second credential to get through the suite door. For anyone running a corporate office in a NYC high-rise, that disconnect is familiar and frustrating. The fix is access control elevator destination dispatch integration, which links your tenant security system to the building’s elevator dispatch so one credential moves a person from the street to their desk.

This guide explains how that integration works, why the “two-badge problem” shows up in NYC Class A buildings, and what facilities managers and IT directors should plan for before signing off on a build-out.

What Elevator Destination Dispatch Integration Means

Elevator destination dispatch integration connects your office access control system to the building’s destination dispatch elevators, so an authorized credential calls the correct car and authorizes the rider’s floor in a single action.

Destination dispatch is the lobby setup where a rider enters or scans a destination before boarding, and the system groups people heading to similar floors into the same car. Traditional elevators rely on up and down buttons inside the cab. Dispatch elevators remove that step and assign a car in advance, which trims wait times in tall towers with heavy morning traffic.

Integrating access control with the elevator system adds identity to that flow. Rather than letting anyone select any floor, the dispatch panel reads a tenant credential and releases only the floors that person is cleared for. Office security and vertical transportation stop behaving like two separate worlds.

Solving the “Two-Badge Problem” in NYC Class A Buildings

The two-badge problem happens because the base building and the tenant run separate access systems, leaving employees to carry one credential for the lobby turnstile and elevator and another for their office suite.

In many Midtown and Hudson Yards towers, the landlord controls the lobby turnstiles and elevator dispatch, while each tenant installs its own door hardware upstairs. Two systems, two credentials, two databases. Employees end up fumbling for the right card at the wrong reader, and IT teams handle onboarding and offboarding in two places.

Closing the two-badge problem in NYC means unifying credentials across both layers. With a connected setup, one mobile or card credential clears the turnstile, books the elevator car, and unlocks the suite. Coordinating that usually takes agreement between the property manager and the tenant’s security integrator, since both sides touch the same rider.

Standalone vs Integrated Elevator Access Control

A standalone elevator reader controls floor access on its own, while an integrated system shares credentials and permissions across turnstiles, elevators, and office doors from one platform.

The difference shows up in daily management and in how fast you can pull access after someone leaves.

FactorStandalone elevator controlIntegrated destination dispatch
CredentialsSeparate card or PIN for the elevatorOne credential across lobby, elevator, and doors
Floor logicManual floor lockoutsAutomatic, tied to the rider’s profile
OffboardingUpdated in each systemRevoked once, applied everywhere
Visitor handlingFront desk escorts or temp cardsPre-issued passes mapped to a floor
ReportingSiloed elevator logsUnified audit trail across entry points

Integration costs more upfront and leans on cooperation from base building management, but it lowers the long-term overhead of running parallel systems.

Credential Models That Work With Destination Dispatch

Credential Models That Work With Destination Dispatch

Most corporate integrations rely on one of three credential models, and the right fit depends on tenant size, security posture, and how much wiring the floor already has.

Mobile credentials

Mobile credentials store the access token on a smartphone and authenticate over Bluetooth or NFC at the dispatch panel. They are the strongest option for corporate teams that want touchless elevator access control, since tokens are harder to clone than a card and can be issued or pulled remotely the same day someone joins or leaves.

Card and fob readers

Card and fob readers stay common because they are inexpensive and familiar. The tradeoff is sharing and loss. A misplaced fob can reach restricted floors until someone reports it, and large card deployments often need heavier cabling at each reader.

PIN and keypad entry

Keypads skip physical credentials and suit smaller tenants watching budget. They slow the morning rush, though, since each rider types a code, and shared PINs erode floor-level control over time.

How Mobile Credentials Connect Lobby Turnstiles to Elevators

A unified credential ties the lobby turnstile, the dispatch panel, and the elevator controller together, so one authentication event releases the turnstile and assigns a car bound for an approved floor.

The flow starts at the turnstile, where the reader validates the credential against the access platform. That same event passes the rider’s floor permissions to the dispatch controller, which selects a car and shows the assignment on a screen. The cab then accepts only the cleared floor, with no open button panel to override the rule.

Building this path cleanly is far easier during construction, before walls close and while conduit, low-voltage runs, and panel locations can still be mapped. Planning the new construction IT infrastructure around both the base building risers and the tenant floor avoids costly rework once the space is occupied.

Security Benefits of Floor-Level Access Restrictions

Floor-level restrictions limit each credential to the floors a person needs, which shrinks the area an intruder or former employee can reach inside a multi-tenant tower.

A lobby turnstile alone proves someone belongs in the building, not that they belong on the 14th floor. Tying identity to the elevator adds a second checkpoint between the street and sensitive space such as server rooms, executive suites, or research areas. For regulated tenants in finance or healthcare, that layered control also supports audit requirements, since the platform records who reached which floor and at what time.

Pairing dispatch integration with well-designed commercial access control systems at the suite doors gives security teams a continuous record from entrance to office, rather than scattered logs that are hard to reconcile after an incident. It also narrows the risk window during staff turnover, since one revocation removes a person from the lobby, the elevators, and every interior door at once.

Coordinating Tenant Security with Base-Building Management

Solid integration depends on early coordination between the tenant’s IT and security team and the building’s property management, since both control hardware that the unified credential has to pass through.

Landlords often standardize on a specific elevator and dispatch manufacturer, so the tenant’s access platform has to support that system’s integration protocol. Sorting out compatibility, credential formats, and who administers shared permissions belongs in the planning phase, not after install. Tenants moving onto a new floor should raise these points during lease negotiation and loop in their integrator early, while the base building team still has room to accommodate the connection.

Handled well, the result is one credential that carries an employee from the sidewalk to their desk, with security and daily convenience drawing from the same source.

Designing Corporate WiFi for Glass-Walled Conference Rooms

Glass conference rooms look sharp, but they create wireless problems that catch a lot of NYC offices off guard. Calls freeze mid-sentence, screen shares stall, and laptops cling to the wrong access point even though the signal bars read full. If that sounds like your boardroom, the cause usually has less to do with weak coverage and more to do with how radio waves behave around glass and dense building materials.

Does Glass Block WiFi Signals in an Office?

Plain interior glass barely blocks WiFi, while the coated glass used in modern towers can cut a signal down hard. That split is the root of most confusion around corporate WiFi design for glass walled conference rooms.

Standard glass partitions absorb very little radio energy, often around 1 to 2 dB, so the signal travels farther than expected and bleeds into neighboring rooms. Coated glass does the opposite and can wall off a room almost completely. Both cause trouble, and knowing which type surrounds your conference rooms changes the entire design.

Why Low-E Glass in Hudson Yards Towers Weakens Your Signal

Low-emissivity glass, common in newer Hudson Yards and Financial District builds, carries a thin metallic coating that reflects heat and reflects WiFi along with it. A boardroom wrapped in this glass can feel sealed off even with an access point a few feet away.

Developers favor Low-E glass because it keeps energy costs down across an all-glass tower. The same coating that bounces sunlight back outside also scatters 5 GHz and 6 GHz signals, the exact bands modern laptops lean on. Teams moving into a fresh build-out often assume the network is broken, while the glass itself is reshaping how WiFi signal through glass walls travels across the office.

How Different Office Materials Affect WiFi Signal Strength

Each wall material weakens a wireless signal by a different amount, and that number drives where access points belong. The figures below give rough attenuation for common NYC office surfaces at 5 GHz.

MaterialApprox. signal lossEffect on coverage
Open airMinimalSignal carries far, wide overlap
Interior glass partition1 to 2 dBLow loss, heavy spillover into nearby rooms
Drywall3 to 5 dBModerate, predictable falloff
Low-E coated glass8 to 20 dBStrong loss, near-sealed rooms
Concrete or brick12 to 20 dB+Heavy loss, common in pre-war conversions

Values shift with thickness and coating, so treat these as planning estimates rather than fixed numbers. A short site survey confirms the real behavior before any hardware goes up.

What Is Co-Channel Interference in Dense Office Buildings?

Co-channel interference happens when two or more access points share the same channel and end up taking turns instead of transmitting at the same time. In a packed Manhattan high-rise, this is one of the biggest hidden causes of slow WiFi.

Because plain glass lets signals carry so far, nearby access points hear each other and wait their turn, which drags throughput down for everyone on the floor. Stack that against the dozens of other tenant networks above and below you in a dense tower, and the airwaves fill up fast. Cutting co-channel interference in a high density WiFi setup comes down to smarter channel planning and lower power, not more hardware.

How Many Access Points Does a Glass Office Need?

Fewer access points running at lower power usually beat a room crowded with units at full strength. Piling on hardware in a glass space tends to multiply interference rather than clear dead spots.

A telltale sign of overbuilt WiFi is strong signal bars paired with choppy video and constant device hopping between access points. The answer is controlled coverage. Plan around how many people and devices use each zone, keep cells from overlapping through the glass, and use narrower channels so more access points can share the spectrum cleanly. A thoughtful approach to corporate WiFi network setup is what keeps a dense floor stable as headcount grows.

Where to Place Access Points in Glass Conference Rooms

Mount access points near room entrances and keep them at least three feet off any glass surface. Placement matters more than raw count once reflections enter the picture.

Keep units away from the glass

Glass reflects radio waves, so an access point pressed against a pane scatters its own signal and inflates readings without improving real performance. A meter of clearance, with ceiling mounting in open areas, keeps coverage clean and predictable.

Avoid mirrored placement

Putting matching access points on both sides of a glass wall guarantees overlap and interference. Stagger them instead, serve multiple rooms from a single well-placed unit where occupancy allows, and reserve a dedicated access point for rooms with eight or more regular users.

Choosing Access Point Models for Glass-Heavy Offices

Choosing Access Point Models for Glass-Heavy Offices

Match the access point model to the size and density of the space rather than buying the most powerful unit on the shelf. WiFi 6E and WiFi 7 hardware handles reflections and 6 GHz traffic far better than older gear.

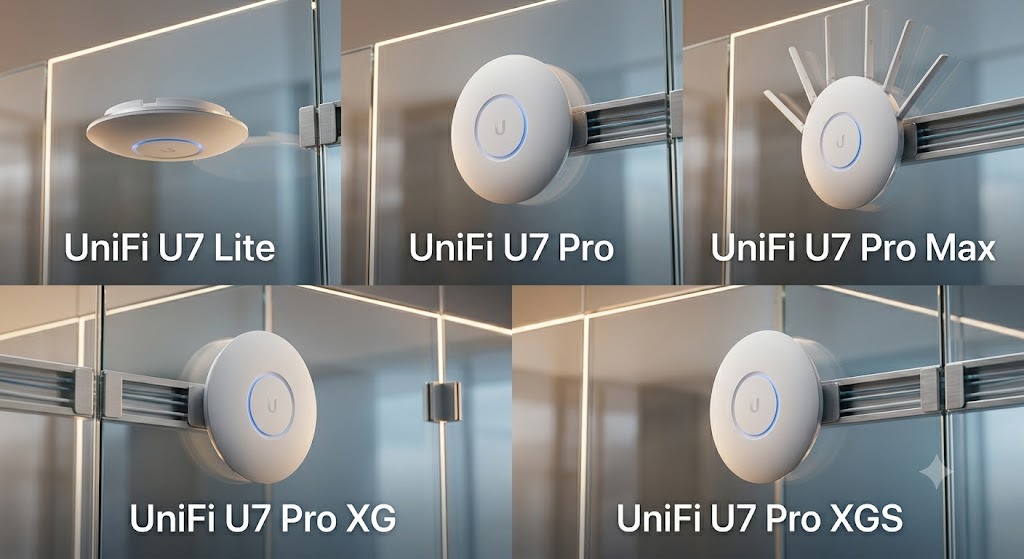
These enterprise models from Ubiquiti’s UniFi line are widely deployed across NYC offices and map well to different floor sizes.

Office sizeSuggested modelBest fit
5 to 25 usersUniFi U7 LiteSmall suites, moderate density
25 to 75 usersUniFi U7 ProMid-size floors with heavy video use
75+ usersUniFi U7 Pro MaxLarge open offices, high client counts
Conference centers, dense glassUniFi U7 Pro XGMulti-gigabit uplink, strong beamforming
Multi-gigabit backbone needsUniFi U7 Pro XGSTop capacity and uplink headroom

Beamforming and multi-link operation on the newer models help cut through the reflections a glass boardroom throws back, which makes them a strong match for executive floors and high-traffic meeting spaces.

How to Fix Dropped WiFi in a Conference Room

Most dropped Zoom and Teams calls in a glass conference room trace back to interference and roaming, not weak signal. Working through a short checklist clears up the majority of cases.

Trim 2.4 GHz and lower power

Start by reducing 2.4 GHz, which travels farthest through glass and causes the most overlap, then lower transmit power on the 5 and 6 GHz radios so each room gets a tighter, cleaner cell. Steer devices toward the faster bands and set a minimum signal threshold so laptops let go of distant access points instead of hanging on.

Run a predictive survey

If calls still stutter after channel and power tuning, a predictive wireless survey usually pinpoints the one room where the glass layout needs its own access point. Getting the wireless layer right also pays off for the hardware bolted into the room, since stable connectivity is what keeps your conference room AV systems running without hiccups during a live meeting.

A glass-walled office does not have to mean unreliable WiFi. Once you account for how the glass scatters signal, plan coverage around real usage, and tune power and channels for the building you occupy, those conference rooms can hold a call as well as any other space on the floor.

The IT Manager’s Guide to NYC Office Relocation Logistics

Moving a corporate office in New York is rarely about the boxes. The real risk lives in the network, the phone system, and the fiber circuit that has to be live the morning your team walks in. Plan that part late and you inherit dead internet, silent desk phones, and staff idle and waiting on the clock. A clear office relocation IT checklist for NYC keeps those failures off your move-in day.

This IT infrastructure relocation guide walks through the timeline, the carrier lead times, and the building rules that catch most IT managers off guard, so you can build a schedule that holds up under a real Manhattan move.

How Long Does an Office IT Relocation Take in NYC?

Most corporate IT relocations in NYC need 60 to 90 days of planning, even though the physical move usually happens over a single weekend.

The hands-on part, unplugging gear and reconnecting it, is short. The long pole is everything that depends on outside parties. Carrier provisioning, building approvals, and cabling work all run on their own calendars, and none of them speed up because your lease is ending.

A useful habit is to map every dependency you do not control, then schedule backward from your first live business day. That list, not your internal task board, is what drives the real timeline.

Navigating ISP Lead Times for a Manhattan Office

New fiber circuits in Manhattan commonly take 60 to 90 days to provision, so the carrier order is the first call you make, not the last.

Providers such as Spectrum Enterprise and Pilot Fiber often quote two to three months for a fresh install, longer if the building needs new riser cable or a letter of authorization from the landlord. ISP lead times for a Manhattan office stretch further in older properties where the existing entrance facility is full or poorly documented.

Order the circuit early and keep your old location active until the new one is tested and confirmed working. Overlapping service for a few weeks costs far less than a week of an offline team. Ask the carrier where the demarcation point lands too, since that decides how far your internal cabling has to reach.

Your 90-Day Office Relocation IT Checklist for NYC

Break the move into four phases tied to fixed deadlines so nothing slides into the final week.

TimeframePriority IT tasks
90 days outOrder ISP circuits, book the cabling vendor, request building COI requirements, inventory all hardware
60 days outConfirm vendor service transfers, design the new floor layout, schedule cabling installation
30 days outTest backups, label cables and equipment, lock in the freight elevator reservation
Move weekendMigrate servers, verify connectivity, run a full day-one network test before staff return

Treat each row as a gate. If a task slips, it pushes everything downstream, and the move weekend has no slack to absorb it.

Freight Elevators, COIs, and Union Labor Rules

Class A Manhattan buildings will not let your movers or cabling crew in without a certificate of insurance and an approved freight elevator slot.

Building management reviews each vendor’s COI before move day, and the coverage limits they demand are often higher than a small vendor carries by default. Sort this out weeks ahead so a paperwork gap does not strand your equipment in the lobby.

Many of these buildings also require union labor for freight elevator operation and after-hours access, which shapes both your budget and your schedule. After-hours moves carry premium rates and book against a limited calendar, so the loading dock can be the hardest resource to secure in the entire project.

How Do You Move an Office Without IT Downtime?

You avoid downtime by choosing a migration model that fits your risk tolerance, then building the move date around it.

Downtime usually comes from one of two places, a circuit that is not ready or a server cutover that runs long. The model you pick decides how exposed you are to both.

Phased migration

Move non-critical teams and systems first, then the core infrastructure once the new site proves stable. This carries the lowest risk and the longest timeline. It suits larger offices that can split the move across two or three weekends.

Parallel run

Stand up the new network while the old one stays live, then cut over once both are confirmed working. This needs overlapping circuits and duplicate equipment, so it costs more, but it gives you a clean rollback if something fails on cutover night.

Single-night cutover

Move everything in one window, then open the next business day on the new setup. It is the cheapest and fastest option, and the most exposed if a dependency runs late. It fits smaller teams with simple infrastructure and a tested backup of every system.

Coordinating Cabling Before You Move

Cabling has to be installed and tested before any equipment arrives, ideally a month ahead of move-in.

Drops in the wrong spots, too few ports, or dead Wi-Fi zones are costly to fix after furniture lands. Walk the new floor with your cabling vendor early and check port counts, server room power, and access point placement against the seating plan. A clean structured cabling installation finished ahead of move day removes the most common day-one failure, which is a desk with no live network port.

Label every run and document the patch panel as the work goes in. That record saves hours during the move weekend and every add or change that follows.

Bringing the Plan Together

Treat the IT move as its own project with its own timeline, not a task bolted onto the furniture move.

The teams that finish without downtime are the ones that ordered circuits early, cleared building paperwork ahead of time, and tested the network before anyone returned to work. Build the schedule backward from your first live business day, and the checklist starts to manage itself. For larger or multi-floor moves, folding the cabling, carrier handoff, and equipment setup into one set of office relocation IT services keeps the full timeline under a single owner instead of scattered across three vendors.

The IT Infrastructure Checklist for Multi-Floor Office Relocations

Moving a corporate office across multiple floors is one of the most complex IT projects a company can take on. It involves coordinating ISP installations, building vertical cabling backbones, staging hardware, and executing a weekend cutover with zero room for extended downtime. This office relocation IT checklist breaks the process into a clear timeline so nothing falls through the cracks.

Why Multi-Floor Moves Fail Without a Plan

Most multi-floor office moves fail because companies underestimate the time required to install ISP fiber circuits and build the vertical cabling backbone between floors. A single-floor move is already complicated, but adding a second or third floor introduces an entirely different set of challenges. You are no longer running horizontal cable from a single closet. You are designing a multi floor network with a Main Distribution Frame on one level and Intermediate Distribution Frames on every other level, all connected by fiber optic risers running vertically through the building.

The timeline for this kind of work is long. ISPs in Manhattan routinely need 60 to 90 days to provision new fiber circuits. Building management approvals for riser access can add weeks. Union labor scheduling for low-voltage work has its own lead times. If you start planning these items two months before the move, you are already behind.

6 Months Out: ISP Circuits and Server Room Design

Six months before moving, you must order your primary and backup internet circuits and finalize the cooling and power requirements for your Main Distribution Frame.

This is the single most time-sensitive item on the entire checklist. Carriers like Verizon FiOS and Spectrum Business in NYC have notoriously long provisioning windows, and those timelines only get worse if the building needs new conduit runs from the street. Contact your ISP immediately and confirm what infrastructure already exists in the building. If there is existing fiber in the basement, your timeline shortens considerably. If there is not, you may be looking at construction permits and street-level work that can push past 90 days.

Server Room and MDF Planning

At the same time, work with your facilities team to finalize the MDF location. The room needs adequate cooling capacity, dedicated electrical circuits with backup power, and enough rack space for your core switches, firewalls, UPS units, and patch panels. Review the configuration plan of the new office with your IT provider and confirm that the minimum requirements for the server room will be met, including electrical load, cooling output, physical dimensions, and security access.

3 Months Out: Low-Voltage Cabling and Fiber Backbones

At the three-month mark, low-voltage contractors must install the Cat6 horizontal cabling on each floor and run the vertical fiber optic backbone connecting the MDF to the IDF closets on other floors.

This is where the multi floor network design becomes physical. Your structured cabling contractor will need building management approval for riser access, and in many NYC commercial buildings, that approval process involves submitting detailed drawings and scheduling around other tenants. Union labor rules in the city may also dictate who can pull cable through certain pathways, so factor that into your vendor selection and scheduling.

Horizontal and Vertical Cable Runs

Horizontal runs bring Cat6 or Cat6A from the IDF closet to each workstation, phone, wireless access point, and security camera on that floor. Vertical runs use fiber optic cable to connect each IDF back to the MDF, creating the high-speed backbone that ties the entire network together. Label every single cable during installation. Color-code by floor or function if possible. This saves hours of troubleshooting later and makes future office relocation services significantly less painful.

1 Month Out: Hardware Staging and Network Configuration

One month prior, all network switches, firewalls, and access points should be physically mounted, powered on, and configured before any furniture arrives.

Waiting until moving weekend to rack and configure network equipment is a recipe for Monday morning chaos. With the cabling already in place, your IT team or managed services provider should be on-site installing switches in the MDF and each IDF, configuring VLANs, testing port connectivity, and verifying that each cable drop maps to the correct switch port.

Pre-Move Testing Checklist

This is also the time to audit equipment and services before the final transition. Inventory all hardware to determine if anything needs upgrading or replacing. Return any leased IT and phone equipment that is no longer needed. Document all active ISP and telecom contracts, and serve notices to providers you plan to discontinue. Run test traffic across the fiber backbone between floors. Verify that wireless access points are broadcasting on the correct channels and that coverage overlaps are minimal. Test VoIP call quality from multiple locations on each floor. If problems surface now, you have weeks to fix them instead of hours.

Protecting Your Data Before the Move

A full backup of all company data, including firewall configurations, server images, and application databases, must be completed and verified before any equipment is disconnected.

Create multiple backup copies and store at least one at an offsite secure data center where it will not be affected by the move. Cloud backup storage is one option for securing critical data. Beyond backups, build a Business Continuity Plan that covers how you plan to switch phone lines, migrate data, and transfer servers. Include an inventory of all software and hardware, a list of business priorities ranked by criticality, and emergency contact details for every telecom and IT vendor involved.

Moving Weekend: The Cutover Strategy

A successful cutover requires a detailed weekend schedule, coordinated freight elevator access, and a Monday morning IT support team on-site to handle immediate user issues.

In a busy NYC building, freight elevator availability is limited and shared with other tenants. Book your time slots early and confirm them with building management the week before. If the building requires an elevator engineer on-site, establish the call-out time in advance and request an on-site engineer to avoid lengthy delays.

The Weekend Execution Plan

Transport backup copies to the new location separately from the main systems. Ask all staff to fully shut down their computers before leaving the old office on the final day. Have cables labeled and matched to each piece of equipment before disconnect. On the new side, your IT team should be powering up servers, testing network connectivity, verifying phone systems, and checking email flow well before Monday morning.

Make a contact list of everyone involved in the move, including IT and telecom vendor technicians, building management contacts, and your internal project leads. Moving corporate office IT infrastructure across multiple floors means coordinating a lot of people simultaneously, and a single miscommunication can cost hours.

Day One: The New Office Test Plan

Your IT and telecom provider should be on-site for the entire first business day to troubleshoot connectivity issues, verify phone routing, and support staff as they settle in.

Walk through the new office with your IT provider and verify that all cabling, equipment, and phones are in the right locations. Test every phone number, including fax lines, DDIs, modems, and any other devices on your system. If call forwarding is active from the old number, confirm it routes to the correct phone. Start all servers and verify that data migration completed successfully. Check incoming and outgoing email. Test intranet and extranet access. Run a broadband frequency test on each network connection.

After the first week, ask staff for feedback about the communication infrastructure. They are the end users, and their input on layout, connectivity, and workspace functionality will surface issues that even the most thorough new office network setup guide cannot anticipate in advance.

High-Density Corporate WiFi for Offices With 100+ Employees

Busy offices rarely have a WiFi problem caused by one bad access point. The issue usually starts with capacity, radio overlap, wall loss, and device mix. A high density wifi network design has to account for all four or the network feels unstable under load.

Why standard WiFi starts breaking down as headcount rises

Standard WiFi starts failing in larger offices because the device count rises faster than the network plan.

A small office can get by with simple hardware and broad coverage. A crowded floor cannot. Laptops, phones, tablets, printers, conference room gear, cameras, and guest devices all compete for airtime. A setup that feels fine at 20 active devices can start dropping calls, buffering video meetings, and slowing cloud apps at 80 or 100.

A corporate office wifi setup needs a different mindset. The goal is not only signal across the floor. The goal is stable service during peak occupancy, with enough airtime for the applications people use all day.

Coverage is only one part of the plan

Coverage without capacity still leads to poor user experience.

A strong signal does not mean the network is ready for a busy office. One access point may cover a large area and still struggle if too many devices connect at the same time. Enterprise wireless network architecture is built around both coverage and capacity instead of signal strength alone.

The hidden fight in dense office buildings

High-density office WiFi has to compete with overlapping networks from nearby suites, neighboring floors, and shared building infrastructure.

Radio interference is not always visible to staff, but it shows up fast in daily use. Calls break up. Screen sharing lags. Roaming between rooms feels inconsistent. In multi-tenant buildings, your access points often share spectrum with many other networks on the same bands.

Walls, glass, metal framing, elevator cores, and mechanical rooms add another layer. Signal may travel farther than expected in one area and die much sooner in another. That is one reason a crowded office often needs floor-by-floor planning tied to a documented network setup strategy for busy offices rather than a generic hardware rollout.

Wall loss and physical obstacles still matter

The physical layout shapes WiFi behavior as much as the hardware does.

Ceiling height, ductwork, storage rooms, conference room glass, dense walls, and equipment closets all change how radios behave. A floor plan may show room dimensions, but it does not fully show signal loss, reflection, or dead spots created by construction materials and furniture density.

More access points do not fix everything

Adding more access points can make the network worse if channel planning and transmit power are ignored.

A common mistake in high density wifi network design is treating every slow zone as a place for one more access point. That can raise overlap, create co-channel contention, and leave devices waiting longer to talk. The result is more hardware with less usable performance.

Good placement is about balance. Access points need spacing, channel discipline, and realistic power settings. The network also needs to support roaming without turning the office into a room full of radios talking over each other.

Placement has to match device behavior

Placement works best if it follows how people and devices use the space.

Open work areas, conference rooms, training rooms, lounges, and reception zones do not carry the same traffic pattern. A floor with scheduled meetings and guest access has different airtime pressure than a floor used mostly for heads-down work. The design phase should map device density by zone, not only by square footage.

Device mix can shape the entire wireless design

The most important devices are not always the newest ones.

Many offices still rely on older laptops, badge readers, handhelds, printers, or room hardware that do not behave like current flagship devices. One weak client can influence channel width, roaming behavior, and access point placement more than many teams expect. In practice, enterprise wireless network architecture has to account for the least capable device that still matters to daily operations.

This is also where office standards matter. If one floor uses older conference hardware, another relies on dense guest access, and another is packed with softphone users, the wireless model has to reflect those real conditions before cabling and mounting begin.

The models that matter in a crowded office

WiFi 6 and WiFi 6E are built for denser device environments and better airtime handling than older standards.

The goal is to match the wireless model to the office load, band availability, and client mix. For many offices, wifi 6 for business is the baseline that makes sense for current deployment planning.

Wireless modelBest fitWhat it changes
WiFi 5Small offices with lighter device densityWorks for modest traffic, but airtime fills up faster in crowded areas
WiFi 6Most modern business floorsBetter handling of many active devices, better efficiency during heavy use
WiFi 6EOffices with compatible clients and heavy demandAdds access to 6 GHz spectrum, which can reduce congestion in the right environment

WiFi 6E is not automatic value on every floor

A newer model still depends on client support, channel planning, and building conditions.

If most employee devices cannot use 6 GHz, the gain may be limited. Compatible hardware and dense meeting traffic can make it a strong fit. The model choice should come after measurement, not before.

Site survey work should happen before mounting and cabling

A wireless site survey gives the design real data instead of assumptions.

Predictive planning is useful, but field data matters. A survey maps signal behavior against the actual environment, including wall density, interference, ceiling conditions, and high-traffic zones. It also gives the team a way to check signal overlap, roaming paths, and dead spots before the office depends on the network daily.

Wireless site survey data for office planning fits into that process. It supports access point placement, channel use, and capacity planning with measurements from the real space instead of guesswork.

Survey findings should lead to design changes

The survey is useful only if it changes the deployment plan.

If measurements show overlap, attenuation, or noisy channels, the design should shift before installation moves forward. That may mean fewer access points in one area, tighter placement in another, revised power levels, or a different mounting plan for conference spaces.

A reliable office network starts with design, not cleanup later

Strong office WiFi is built during planning, not rescued after staff start complaining.

A large office network has to do more than reach every desk. It has to carry meetings, cloud traffic, roaming users, guest access, and older devices at the same time. That takes capacity planning, access point discipline, model selection, and real survey data tied to the environment.

Offices that stay stable under load usually follow the same pattern. They define device demand early, plan around physical obstacles, choose the right wireless model, and treat high-density deployment as a design problem instead of a hardware shopping list.

Integrating Meeting Room Booking Systems with Your Access Control

Every office has the same problem. Someone books a conference room at 2 PM, never shows up, and the room sits locked and empty while three other teams scramble for a place to meet. In buildings where rent runs over $70 per square foot, that waste adds up.

A meeting room booking system integration ties your scheduling software directly to your physical security hardware so that rooms are only accessible to the people who reserved them, and unused rooms get released back to everyone else. It is one of the most practical upgrades a facilities team can make.

What “Ghost Meetings” Cost Your Office

A ghost meeting is a conference room booking that nobody ever uses, and it is one of the biggest sources of wasted space in a corporate office.

Research from workplace analytics firms consistently shows that 30% to 40% of booked meeting rooms go completely unused. In a 20-room office, that means six to eight rooms sitting idle during peak hours every day. Multiply that by per-square-foot lease costs, and the financial impact runs into tens of thousands of dollars per year.

The frustration goes beyond the budget. Teams that need a room see a full calendar and assume nothing is available. They push meetings to another day or crowd into a space that is too small.

How a Conference Room Scheduling Display Works

A meeting room booking system uses a digital touch panel mounted outside each conference room that syncs with Google Workspace or Microsoft 365 calendars in real time.

These panels, sometimes called conference room scheduling displays, show the current booking status at a glance. Green means available, red means occupied. Employees can book from the display, a mobile app, or their desktop calendar, and all three stay in sync. Platforms like Robin, Joan, Archie, and Skedda all operate on this model, though they differ in pricing, features, and hardware approach.

Where Standalone Booking Falls Short

On their own, these systems solve the visibility problem but not the accountability problem. A room can display as “occupied” on the panel and remain physically empty because nobody showed up. The booking system has no way to verify presence or trigger a response.

That gap is where the connection to access control installation becomes valuable.

Tying Room Scheduling to Physical Access

When you integrate a booking system with access control, the conference room door stays locked until the person who reserved it authenticates with a keycard, mobile credential, or biometric scan.

This changes the dynamic entirely. If a meeting is booked for 10 AM and nobody badges in by 10:15, the system automatically cancels the reservation and releases the room. Other employees see the update on the conference room scheduling display and can grab the space.

How the Integration Works in Practice

The booking platform communicates with the access control system through an API or middleware layer. When a reservation is created, the access control system receives a time-bound unlock permission tied to a specific credential. Outside of that window, the door remains secured under the building’s standard commercial security systems protocols. Legal teams, HR departments, and executive groups can also restrict room access to specific badge holders during their reserved block.

Popular Booking Platforms and What They Offer

The right meeting room booking platform depends on your office size, your existing calendar ecosystem, and how much hardware you want to manage.

Here is a comparison of five widely used platforms in 2026.

PlatformPricing ModelBest ForKey Differentiator
RobinCustom quote, starts around $5,000/yearLarge enterprises, 500+ employeesDeep analytics, sensor integrations, AI room suggestions
JoanPer user + per device, from ~$57/monthOffices that want sleek e-paper room displaysBeautiful low-power hardware, multi-tenant support
ArchiePer room, from $8/room/monthMid-sized offices wanting predictable costsNo per-user fees, strong no-show protection
SkeddaPer space tier, from $99/monthSMBs, universities, event spacesSimple setup, solid booking rules engine
Officely$12/space/month, unlimited usersSlack-first or Teams-first small teamsLightweight, lives inside Slack or Microsoft Teams

Each platform supports calendar sync, check-in workflows, and some level of room usage reporting. The differences show up at scale. Per-user pricing models tend to climb as headcount grows, while per-room models stay more predictable.

Using Workspace Utilization Analytics to Cut Costs

Integrated booking and access systems generate data on actual room usage versus booked time, giving facilities teams the numbers they need to make real decisions about office layout.

Most standalone booking tools tell you how often rooms are reserved. An integrated system tells you how often they are occupied. A boardroom booked 80% of the time but used only 45% is a very different problem than a huddle room running at full capacity all week.

Metrics Worth Tracking:

MetricWhat It Tells You
No-show ratePercentage of bookings where nobody badges in
Peak utilization hoursTime windows with the highest actual occupancy
Average meeting duration vs. booked durationHow much buffer time is being wasted
Room type demandRatio of huddle room bookings to boardroom bookings
Utilization by departmentWhich teams over-book or under-use meeting spaces

Workspace utilization analytics at this level give you a clear picture of what your office needs. If 10-person boardrooms sit half-empty while huddle rooms are booked solid, that is a signal to convert space.

Choosing the Right Hardware Setup

The most effective smart office access control setups combine PoE-powered touch panels outside the room with occupancy sensors inside to create a fully automated check-in and release loop.

PoE panels draw power and data through a single Ethernet cable, which simplifies installation. Occupancy sensors, typically ceiling-mounted PIR or millimeter-wave units, detect motion inside the room and feed that data back to the booking system.

Hardware Components for a Full Integration

The basic hardware stack for a single room includes a wall-mounted booking panel running your scheduling software, a PoE network switch port to power the display, a door-side card reader tied to your access control system, and an in-room occupancy sensor for automated presence detection.

Software and Network Considerations

The booking platform, access control system, and occupancy sensors all need to communicate reliably. That means a stable network backbone with adequate PoE budget on your switches and clean API connections between systems.

What This Looks Like Day to Day

The value of meeting room booking system integration shows up in small moments that compound over time. An employee taps their phone, the door unlocks because the system recognizes their reservation. A team lead checks the dashboard and sees two large rooms with a 60% no-show rate, so she converts one into smaller focus rooms.

None of this requires a massive technology overhaul. It starts with the booking software, connects to the physical security layer, and grows as the data tells you what to change.

Low Voltage Cabling Standards For 2026 Corporate Office Networks

The heart of a modern workplace is not the wireless signal floating through the air but the quiet network of cables hidden in walls and ceilings. In 2026 the quality of your low‑voltage cabling determines how well your phones, cameras, computers and meeting room displays work together. This guide outlines the current standards and best practices for corporate build‑outs so that your organisation can support today’s applications and prepare for tomorrow’s innovations.

Your corporate office’s hidden network and cabling foundation

Low‑voltage cabling is the physical foundation powering your entire corporate network, security cameras, access control and meeting room technology. Without a well designed cabling system, even modern devices cannot perform at their best. Investing in quality cable reduces bottlenecks and downtime and ensures network speed and call quality.

Choosing Cat6 or Cat6A for your 2026 network

Cat6A is the recommended standard for 2026 corporate build‑outs because it carries ten‑gigabit Ethernet across the full 328‑foot distance while Cat6 drops to one gigabit after about 180 feet. Standard Cat6 may suffice for shorter runs but cannot deliver ten‑gig speeds over longer distances. Cat6A’s thicker conductors and tighter twists reduce crosstalk, supporting higher data rates and PoE for new devices. Choosing Cat6A today avoids the need to replace cable as network speeds increase.

How Cat6, Cat6A and fiber stack up for corporate offices

The following table shows how Cat6 and Cat6A compare to fiber for high‑bandwidth needs.

Cable typeSupported speedMaximum distanceTypical use
Cat6Up to ten gigabit in ideal conditions, typically one gigabitAbout 180 feet at highest speedSmall networks and short runs
Cat6ATen gigabit328 feetNew office projects and future‑proof installations
Fiber opticTwenty‑five gigabit and higherThousands of feetVery high bandwidth or long distances

Cat6A cables use thicker conductors to handle more power and data, making them a reliable option for lighting and networked cameras. Fiber offers the most bandwidth and range but is usually reserved for backbone runs because installation and termination cost more.

Why plenum rated cables matter for your office build out

Fire codes require plenum‑rated cables in air‑handling spaces because they emit less toxic smoke and resist flame spread. Areas above ceilings and under raised floors often handle air flow, so any materials there must resist flame and fumes. Plenum cable uses a special jacket that burns slowly and releases fewer toxins. Building codes frequently require these cables in drop ceilings, so look for products marked “CMP” or “plenum‑rated” to stay compliant.

Keeping your office cabling organised and safe

Supporting cables with J‑hooks, trays or racks prevents stretching and keeps signals clear. Haphazard cabling causes signal loss, complicates maintenance and shortens cable life. Plan your pathways using trays or ladder racks, secure bundles with hook‑and‑loop straps instead of plastic ties and label both ends while pulling spare drops for capacity. A tidy closet with patch panels and cable guides reduces accidental disconnections. Our structured cabling best practices for commercial environments page offers guidance on rack layouts and cable routing.

Preparing your network for PoE and future devices

Modern offices should plan for high‑wattage PoE to power lighting, cameras and audio‑visual equipment through the network. Power over Ethernet can deliver up to ninety watts for devices like cameras, lights and access points, so design your closets with enough power budget. Cat6A’s larger conductors help dissipate heat and centralising power supplies makes maintenance easier. Planning for PoE eliminates separate electrical circuits and lets you move devices as needs change.

Choosing fiber for high bandwidth and long distances

Use fiber optic cable where you need extreme bandwidth or to span long distances without signal loss. Copper is approaching its limits; fiber delivers speeds of twenty‑five gigabit and beyond over long distances. Use multi‑mode fiber within buildings and single‑mode for longer runs. Because it costs more to install and terminate, fiber is usually reserved for backbone runs and other high‑bandwidth applications. Mixing copper and fiber creates a tiered network that balances performance and cost.

Choosing reliable cabling products and partners

Choosing reputable vendors and standards‑compliant products protects your investment. Low‑quality cables made from copper‑clad aluminium often fail to meet standards or carry power safely. Select vendors whose products carry independent certifications and warranties. If your project still uses coaxial cable, choose solid copper RG6 rather than copper‑clad steel. Working with trusted manufacturers reduces the risk of defects and saves time.

Planning and protecting your office cabling installation

Careful planning and physical protection of your cabling prevent costly faults and downtime. Plan the number of drops each room needs and run extra cables for redundancy. Label both ends, use different colours to distinguish systems, keep network cables away from electrical lines, keep to the bend radius, avoid over‑tightening bundles, and protect your cables from moisture and sharp edges.

Wiring a new office building while balancing current and future needs

Designing the cabling plan for a new office involves balancing current needs with future growth. Assess your workforce and device requirements, map horizontal runs to intermediate distribution frames and vertical links to the main equipment room, and use separate conduits for data, voice, access control and audiovisual to prevent congestion. Plan locations for wireless access points and IoT sensors, and refer to our overview of how to wire a new office building with structured cabling for planning steps.

Structured cabling practices for scalable office networks

Adhering to structured cabling best practices keeps your network scalable and manageable. This approach organises cabling into subsystems like work area, horizontal runs and backbone links, each following standardised termination and labelling methods. Use patch panels and modular jacks to rearrange connections without disturbing permanent cabling, keep patch cords tidy to maintain airflow and test and certify each run. Treat structured cabling as an evolving strategy rather than a one‑time project.

Beyond copper and wireless in the modern office

Some systems still rely on coaxial cable or wireless but they should complement rather than replace structured copper networks. Coax can still distribute legacy video but lacks the data rates and power capabilities of modern cabling. Wireless networks offer mobility for mobile devices and guests, but wired connections provide stability and security. Use wireless as a complement, not a replacement.

Keeping up with standards and planning upgrades

Keeping up with industry changes helps you plan upgrades and avoid obsolescence. Standards for Ethernet categories, PoE limits and fire safety evolve, and new devices may demand higher speeds or more power. Stay current through technical newsletters and professional advice, and periodically assess your cabling to identify weak points and plan upgrades.

Bringing it all together for your office network

A thoughtful low‑voltage cabling plan is the unseen hero of a modern workplace. By selecting appropriate cable types, complying with safety codes, managing installations carefully, planning for PoE, wiring new offices thoughtfully, choosing trustworthy vendors and staying informed about evolving standards, you build a network that supports today’s workload and adapts to future demands.

Wireless Presentation Systems: Cutting the Cord in the Conference Room

Anyone who runs meetings in a busy NYC office knows the routine. Someone walks in with a USB-C laptop, the table cable is HDMI, last week’s dongle has gone missing, and five people sit watching while IT gets paged. Wireless presentation systems end that loop and are now standard in how modern offices share content and run hybrid calls.

This guide covers how these systems work, the difference between consumer and enterprise versions, what corporate networks need from them, and which models are showing up in NYC office build-outs in 2026.

The Hidden Cost of Conference Room Cables

Broken HDMI cables, missing dongles, and incompatible ports cause the average corporate meeting to start about ten minutes late, which adds up to thousands of dollars in lost productivity each quarter for mid-sized companies.

Ten minutes does not sound like much in isolation. Spread it across a 200-person office running four meetings per room per day, and you reach hundreds of wasted hours every month. Office managers feel this most. They field the Slack messages about a frozen screen and write the IT ticket after the fact.

Wired setups also create a quieter problem. Cables fail under daily wear, ports go out, and adapters get pocketed. Going wireless removes most of those moving parts and gives users one way to share regardless of which laptop they brought in.

Consumer vs. Enterprise Wireless Sharing

Consumer devices like Apple TV and Chromecast require everyone on the same WiFi network, while enterprise systems like Barco ClickShare and Mersive Solstice create their own secure connection that keeps guests off your corporate LAN.

That distinction matters more than it sounds. A financial firm in FiDi or a law office in Midtown cannot put a visiting client on the same network that hosts internal file shares. Consumer streaming devices were built for living rooms, not for offices that need to pass an audit.

FeatureConsumer DevicesEnterprise Systems
Network requirementSame WiFi as userStandalone or guest VLAN
EncryptionBasicAES, RSA-based
Guest accessRisky on corporate LANIsolated, no LAN exposure
Simultaneous sourcesOne at a timeUp to four
Central managementLimitedFull IT dashboard

The cost gap closes once you factor in support tickets, replacement adapters, and meetings that fail mid-pitch. IT teams running enterprise wireless display setups across more than a few rooms tend to see the math work out within two years.

How an Enterprise Wireless Presentation System Works

An enterprise wireless presentation system for conference room use runs through a small base unit behind the display, which receives content from either a USB button plugged into a laptop or a desktop app on the user device.

The hardware route uses a physical button. Plug it in, press once, and your screen appears on the room display. The software route skips the dongle and uses an installed client or a browser. Both send an encrypted stream from the laptop to the base unit, which decodes it and pushes the picture to the TV.

Hardware buttons vs. software clients

Buttons are the simpler option for guests. Hand them one, they plug it in, and it works without an install or login. Software clients suit internal teams that already have the app deployed through MDM. Most mixed-use offices end up running both, with buttons for visitors and the app for employees.

Sharing screens wirelessly during a meeting

For anyone wondering how to share screen wirelessly in meeting rooms without IT involvement, the user experience stays the same across most platforms. Pick the room from the app, confirm a four-digit code on the display, and the share starts. After the first session, it is faster than finding a cable.

Securing Guest Access in High-Trust Office Environments

Enterprise wireless systems secure guest access through AES encryption end to end and an isolated guest VLAN, so external users can present without ever touching internal company data.

This is where consumer hardware falls apart in a corporate setting. A financial firm dealing with material non-public information cannot allow a vendor laptop onto the same network segment as the file servers. Even a friendly visitor brings unknown software, unpatched browsers, and risks the IT team has no way to vet on the spot.

A correctly configured enterprise system sits in a network DMZ. The base unit talks to the corporate LAN only enough to reach the calendar service, while the stream travels over its own SSID or a dedicated guest VLAN. For teams with layered defenses through their advanced network security setup, slotting a wireless display into the existing VLAN structure does not weaken what is already protecting the network.

A few security defaults worth confirming with any vendor before purchase.

  • AES-128 or higher encryption on all wireless traffic
  • 802.1X authentication on the base unit
  • Option to disable peer-to-peer sharing
  • Centralized logging and remote firmware updates
  • Full device isolation on its own VLAN

Models Worth Looking At in 2026

A handful of names handle the bulk of corporate deployments. Each fits a different room and budget profile.

Barco ClickShare CX-30 and CX-50

ClickShare remains the default for corporate IT teams reviewing barco clickshare alternatives or staying with the original. The CX-30 covers mid-sized rooms with three buttons and supports dual-screen output for Microsoft Teams Rooms. The CX-50 adds a fourth button, audio sharing, and HDMI input for legacy connections. Both run AES-128 encryption.

Mersive Solstice Pod Gen 4

Solstice leans toward collaboration rather than broadcasting. Up to four users share at once, the system supports annotation through the Solstice app, and PoE+ delivers power and network through one Ethernet run.

Kindermann Klick and Show K-FX

A solid mid-tier pick that supports four simultaneous sources, includes whiteboarding, and switches into digital signage mode while the room sits idle. Good fit for spaces that double as collaboration room and lobby display.

Crestron AirMedia Series 3

For offices already standardized on Crestron control systems, AirMedia integrates with existing room schedules and touch panels. Single-cable BYOM is supported, and the device fits inside the wider Crestron ecosystem without adding another management pane.

Choice usually comes down to existing vendor relationships, room count, and how much annotation or multi-user sharing the team really does. A design walkthrough before deployment saves a lot of regret later, especially in offices building out broader conference room AV systems that include cameras, mics, and scheduling panels.

Integrating Wireless Sharing with Zoom and Teams

Modern wireless systems support Bring Your Own Meeting, which lets a user wirelessly connect their laptop to the room camera, microphone, and speakers, so they can run a Zoom or Teams call from their own device using the room hardware.

This feature pushed wireless presentation from a nice-to-have into a near requirement for hybrid offices. A user walks in, joins their own scheduled call, and the room takes over the AV side without anyone logging into a room account. Camera, mic, and speakers route through the wireless connection back to the laptop.

BYOM also reduces licensing complexity for IT. Instead of buying a Teams Rooms license and a Zoom Rooms license for every room, you license the user, and the room hardware works with the platform that user is running that day. Most enterprise systems handle Zoom, Teams, Google Meet, and Webex out of the box.

Hybrid meetings are the real test of any room setup. Wireless display hardware that gets BYOM right turns a conference room into a space employees want to use, instead of one they avoid because the tech is unreliable.